You’ve spent hours picking the perfect wall color, but something still feels… off. Before you second-guess your choice, look up. We often pour all our energy into the walls and forget about the “fifth wall” right above us. A dingy or stained ceiling can make an entire room feel dark and small, no matter how beautiful the rest of the space is. The good news is that ceiling painting is one of the most transformative, high-impact projects you can tackle. It instantly brightens the room and provides a clean, fresh canvas. I’ll walk you through every step for a flawless finish.
Key Takeaways
- Prioritize preparation for a perfect canvas: A professional-looking ceiling depends on what you do before painting. Always clean the surface, fill any cracks, and apply a stain-blocking primer over repairs or water spots to guarantee an even, lasting finish.
- Use the right paint and tools for the job: Choose a flat paint sheen to hide imperfections effectively. Your roller choice is also key: use a shorter nap for smooth ceilings and a thicker nap to get full coverage on textured surfaces.
- Paint with a plan to avoid streaks: To prevent roller marks, cut in the edges first with a brush. Then, as you roll, work in sections and always maintain a “wet edge” by blending each new stroke into the previous one before it dries.
Planning Your Ceiling Painting Project
A little planning can make the difference between a weekend of frustration and a stunning, professional-looking result. Before you even think about picking up a roller, it’s smart to map out your project. Understanding the time commitment, potential costs, and the right sequence of steps will help you manage expectations and avoid common pitfalls. Getting these details sorted out first ensures a smoother process from start to finish, whether you decide to tackle it yourself or bring in a professional team. Let’s walk through the three biggest questions you should ask when planning your ceiling paint job.
How Long Does It Take to Paint a Ceiling?
For a standard-sized room with a flat ceiling, you can generally expect the project to take about a day. As Sherwin-Williams notes, it’s a beginner-friendly task that can be completed relatively quickly. However, this timeline can change based on a few factors. If your ceiling is textured, has high vaults, or needs significant prep work like patching cracks and sanding, you should budget extra time. The paint drying time between coats of primer and paint also adds to the total duration. If you’re short on time or the job feels a bit too big, remember that a professional crew can often get it done much faster. Our team of expert interior painters has the process down to a science, ensuring a flawless finish in the most efficient way possible.
What Is the Average Cost to Paint a Ceiling?
The cost of painting a ceiling can vary quite a bit. According to Angi, you can expect to pay between $0.50 and $5 per square foot. For a simple, single-room project, the cost often lands around $1 per square foot. This price range typically includes labor and basic materials if you hire a pro. The final cost depends on the type of paint you choose, whether you need a special stain-blocking primer for water spots or smoke damage, and the extent of any necessary repairs. If you’re considering hiring professionals, the best way to get an accurate number is to get a detailed estimate. We offer financing options to make your project more manageable and are always happy to provide a free, no-obligation quote.
What Is the Correct Order to Paint a Room?
This is one of the most important pro tips you can follow: always paint the ceiling first. As the experts at Behr advise, starting with the ceiling is non-negotiable for a clean job. Think about it—gravity is not your friend when you’re rolling paint overhead. Drips and splatters are bound to happen, no matter how careful you are. If you paint your walls first, you’ll end up with little specks of ceiling paint on your fresh new color, forcing you to do touch-ups. By painting the ceiling first, any mess lands on surfaces you haven’t painted yet, like the walls and trim. You can simply wipe them away or paint over them later, saving you a major headache and ensuring your house painting project has crisp, clean lines. If your room refresh is part of a larger kitchen upgrade, you may also want to consider cabinet painting to complete the transformation.
Your Essential Ceiling Painting Checklist
Before you even think about dipping a roller in paint, let’s talk about gear. Gathering the right tools is the first and most important step toward achieving a ceiling that looks like it was painted by a pro. The right equipment not only makes the job easier but also dramatically improves the quality of your final result. Think of it as setting yourself up for success from the very beginning. You don’t need a truck full of supplies, but a few key items will make all the difference. We’ll walk through the essentials: the best brushes and rollers for the job, the ideal paint and primer, and the protective gear you’ll need to keep your room (and yourself) clean.
Gather Your Supplies and Tools
Before you can get that satisfying first roll of paint on the ceiling, you need to assemble your toolkit. Having everything you need within arm’s reach prevents those frustrating mid-project runs to the hardware store and helps you work more efficiently. A well-prepared painter is a successful painter, after all! Think of it in three main categories: tools for prep, tools for painting, and gear for protection. This checklist will ensure you have all the essentials on hand, from sandpaper and primer to the right roller and, of course, plenty of drop cloths to protect your floors and furniture.
Sandpaper, Rags, and Other Essentials
Let’s start with the prep work, the step our own expert interior painters consider the most critical for a flawless finish. You’ll need medium-grit sandpaper (around 150-grit) to smooth any rough patches and a putty knife with spackle to fill cracks or holes. Don’t forget a few clean rags and a simple cleaning solution to wipe down the ceiling—paint won’t stick to dust or grime. To protect your room, lay down drop cloths over floors and furniture, and use painter’s tape to create sharp lines along walls and trim. As experts at This Old House recommend, having these items ready before you open a can of paint is non-negotiable for a clean, professional job.
Find the Best Brushes and Rollers
When it comes to painting tools, quality really matters. For cutting in around the edges where the ceiling meets the wall, grab a high-quality, 3.5-inch angled brush. This will give you the control you need for crisp, clean lines. For the main surface, your roller choice depends on your ceiling’s texture. A roller cover with a 3/8-inch or 1/2-inch nap is perfect for most smooth ceilings. If you have a textured or popcorn ceiling, you’ll need a thicker nap, like 3/4-inch or even 1 1/4-inch, to get paint into all those nooks and crannies. Using the right tools is a key part of any expert interior painting project.
Pick the Perfect Paint and Primer
Here’s a little secret from the pros: always choose the right paint sheen for ceilings. Flat paint is non-reflective, which means it does an excellent job of hiding small imperfections and roller marks. It also makes touch-ups much easier down the road. Just as important is the primer. If your ceiling has any stains from old water leaks, smoke, or kitchen grease, a high-quality stain-blocking primer is non-negotiable. Primer ensures your topcoat adheres properly and gives you a uniform, beautiful finish. Professional house painters know that the right paint and primer are the foundation of a lasting job.
How to Protect Yourself and Your Space
A great paint job doesn’t leave a mess behind. Before you start, take the time to protect your space. Cover floors, furniture, and countertops with drop cloths or plastic sheeting. If you can’t remove a light fixture, cover it completely with plastic and painter’s tape to shield it from splatters. And don’t forget about yourself! Wear old clothes, comfortable shoes, and a hat or bandana to keep paint out of your hair. A pair of safety glasses is also a great idea to protect your eyes from drips. This level of care and preparation is a hallmark of true professionalism, and it’s a standard we hold ourselves to on every project. You can learn more about us and our commitment to a clean workspace.
Prep Your Ceiling for a Perfect Finish
Let’s be honest, prepping a room for painting is the part everyone wants to skip. It feels like a chore standing between you and the satisfying part of rolling on a fresh new color. But I can’t stress this enough: proper preparation is the single most important factor in achieving a smooth, professional-looking finish. Rushing this stage is what separates a DIY job from a pro result. Taking the time to clean, repair, and protect your space ensures the paint adheres correctly and looks flawless for years to come.
Think of it as creating the perfect canvas. You wouldn’t start a masterpiece on a dirty, damaged surface, and your ceiling is no different. These steps will set you up for success and make the actual painting process much smoother. If you’re looking for a perfect finish without the hassle, our expert interior painting services always include meticulous prep work.
Start with a Clean, Inspected Surface
First things first, you need a clean slate. Ceilings collect dust, cobwebs, and grime that prevent paint from sticking properly. Grab a microfiber mop and give the entire ceiling a thorough wipe-down. If you’re painting a kitchen ceiling, you’ll likely need to cut through a layer of grease with a good degreasing cleaner. For older homes, especially those with popcorn ceilings, it’s wise to have a professional check for lead paint or asbestos before you disturb the surface. Safety is always the top priority.
Fix Any Cracks, Holes, or Bumps
Once your ceiling is clean, it’s time to play detective. Look closely for any cracks, nail pops, or water stains. You’ll want to fix any repairs on the ceiling before you even think about opening a can of paint. After patching and sanding the area smooth, it’s crucial to spot prime. Applying a primer sealer just to the repaired spots is important because it helps the final paint stick evenly and prevents a blotchy appearance. This extra step is a core part of our service guarantee because it ensures a uniform, long-lasting finish.
Remove Fixtures and Cover Your Furniture
Your final prep step is to protect everything you don’t want painted. Start by turning off the power at the circuit breaker, then remove any ceiling lights, fans, or vents. Painting around these fixtures is tedious and often leads to messy results, so taking them down is well worth the effort. Next, cover your furniture and floors completely with plastic sheeting or drop cloths to shield everything from inevitable paint drips and splatters. With everything covered, you’ll have a clear, protected space to work in.
Set the Right Room Temperature
You might think room temperature is just about your own comfort while you work, but it’s a huge factor in how your paint dries. For the best results, aim for a temperature between 50°F and 85°F. This is the sweet spot where most paints, especially latex and acrylics, adhere properly and cure evenly. If the room is too hot, your paint will dry too quickly, creating noticeable roller marks and streaks. On the other hand, if it’s too cold, the paint won’t cure correctly, leaving you with a weak finish. Keeping the climate in check is a simple step that professional house painters never skip to ensure a flawless result.
What’s the Best Paint for Ceilings?
Walking down the paint aisle can feel overwhelming, but choosing the right paint for your ceiling doesn’t have to be complicated. The right product will make the job easier and give you a much better result. It really comes down to three key decisions: the paint’s sheen, its color, and whether you need to use a primer first. Getting these three things right is your ticket to a professional-looking finish that you’ll be proud of. Let’s break down what you need to know to pick the perfect paint for the job.
Why Flat Paint Is Your Best Bet
When it comes to paint sheen, flat is the undisputed champion for ceilings. A flat (or matte) finish absorbs light instead of reflecting it. Why does that matter? Because ceilings are large, flat surfaces that show every little imperfection, especially in bright light. A glossy or semi-gloss paint would highlight every tiny bump and flaw, but a flat finish does an excellent job of hiding them, giving your ceiling a smooth, uniform look. Another great benefit is that flat paint is much easier to touch up later without the new paint flashing or standing out. For a flawless finish, a high-quality flat paint is almost always the way to go for your expert interior painting project.
Look for Specialized Flat or Dead-Flat Ceiling Paint
While any flat paint is a good start, you can take it a step further by looking for a product specifically labeled “ceiling paint.” These formulas are usually a “dead-flat” or “ultra-flat” sheen, which is even less reflective than a standard flat finish. As the experts at Sherwin-Williams note, non-reflective paint “does an excellent job of hiding small imperfections and roller marks.” Specialized ceiling paints are engineered to maximize this effect, giving you the smoothest possible appearance. They are also often formulated to be a bit thicker to minimize drips and splatters while you’re working overhead—a huge plus! Using the right materials is a key part of any expert interior painting project and ensures a truly professional result.
Choose a Color to Brighten Your Room
White is the classic, go-to color for ceilings for a good reason. It reflects the most light, making any room feel brighter, bigger, and more open. A crisp white ceiling provides a clean backdrop that works with any wall color or decor style. But you don’t have to stick with standard white. Choosing a lighter color, like a pale blue or a soft gray, can also make a room feel taller and more spacious. On the other hand, a dark ceiling can create a dramatic, cozy, and intimate atmosphere, which works beautifully in bedrooms or dining rooms with high ceilings. The color you choose can completely change the feel of a room, so think about the mood you want to create.
Consider Color-Changing Paint for Easy Application
Painting a white ceiling with fresh white paint can be a real test of your patience. It’s incredibly difficult to see where you’ve already rolled, which often leads to missed spots and an uneven finish. This is where a clever product can make your life much easier: color-changing ceiling paint. As paint experts at Benjamin Moore point out, this type of paint goes on as a faint color, like pink or light blue, and then dries to a standard bright white. The temporary color allows you to see your coverage clearly, ensuring you don’t miss a single spot. It takes the guesswork out of the process and helps you achieve a perfectly uniform coat, saving you from the frustration of finding patchy areas after the job is done.
Do You Really Need to Prime?
Primer is the foundation of a great paint job, and it’s especially important for ceilings with issues. If your ceiling has water stains, smoke damage, or stubborn marks, a stain-blocking primer is non-negotiable. It will seal the stain and prevent it from bleeding through your new paint. You should also prime any areas you’ve repaired with spackle or joint compound. This step, called “spot priming,” is crucial because new patches absorb paint differently than the rest of the ceiling. Without primer, those spots can look dull or blotchy. Taking the time to prime correctly is a key part of our service guarantee and ensures your final coat looks even and beautiful.
When to Use a Primer
Primer is your best friend when you’re dealing with a less-than-perfect surface. Think of it as a problem-solver. You absolutely need to use a primer if your ceiling has water stains or smoke damage; a special stain-blocking primer creates a barrier to stop those marks from bleeding through your fresh paint. The same goes for any new drywall patches or areas you’ve repaired with spackle. These spots are extra porous and will soak up paint differently, leaving a blotchy, uneven look if you don’t prime them first. Finally, if you’re making a dramatic color change—like going from a dark navy to a bright white—a coat of primer will help you achieve the true color with fewer coats of paint. This is a critical step that professional commercial painters never overlook.
When You Can Skip the Primer
So, when can you get straight to the fun part? You can often skip a separate primer coat if your ceiling is in great shape. This means it has been painted before, the surface is clean, there are no stains or repairs, and you aren’t making a drastic color change. For example, if you’re just refreshing a white ceiling with a new coat of white, you’re likely good to go. Many high-quality “paint-and-primer-in-one” products are designed for exactly this scenario. Just remember, this shortcut only works for pristine ceilings. If you have any doubts, taking the extra time to prime is always the safest choice. It’s a key part of the prep work that ensures the beautiful results we back with our service guarantee.
How to Paint a Ceiling, Step by Step
With all your prep work complete, it’s time to start painting. This is where your careful planning pays off. The key to a professional-looking finish is a methodical approach. Don’t rush this part. Work in a calm, steady rhythm, and you’ll have a beautifully painted ceiling in no time. We’ll break down the process into three simple stages: cutting in, rolling the main surface, and maintaining a wet edge for a seamless look.
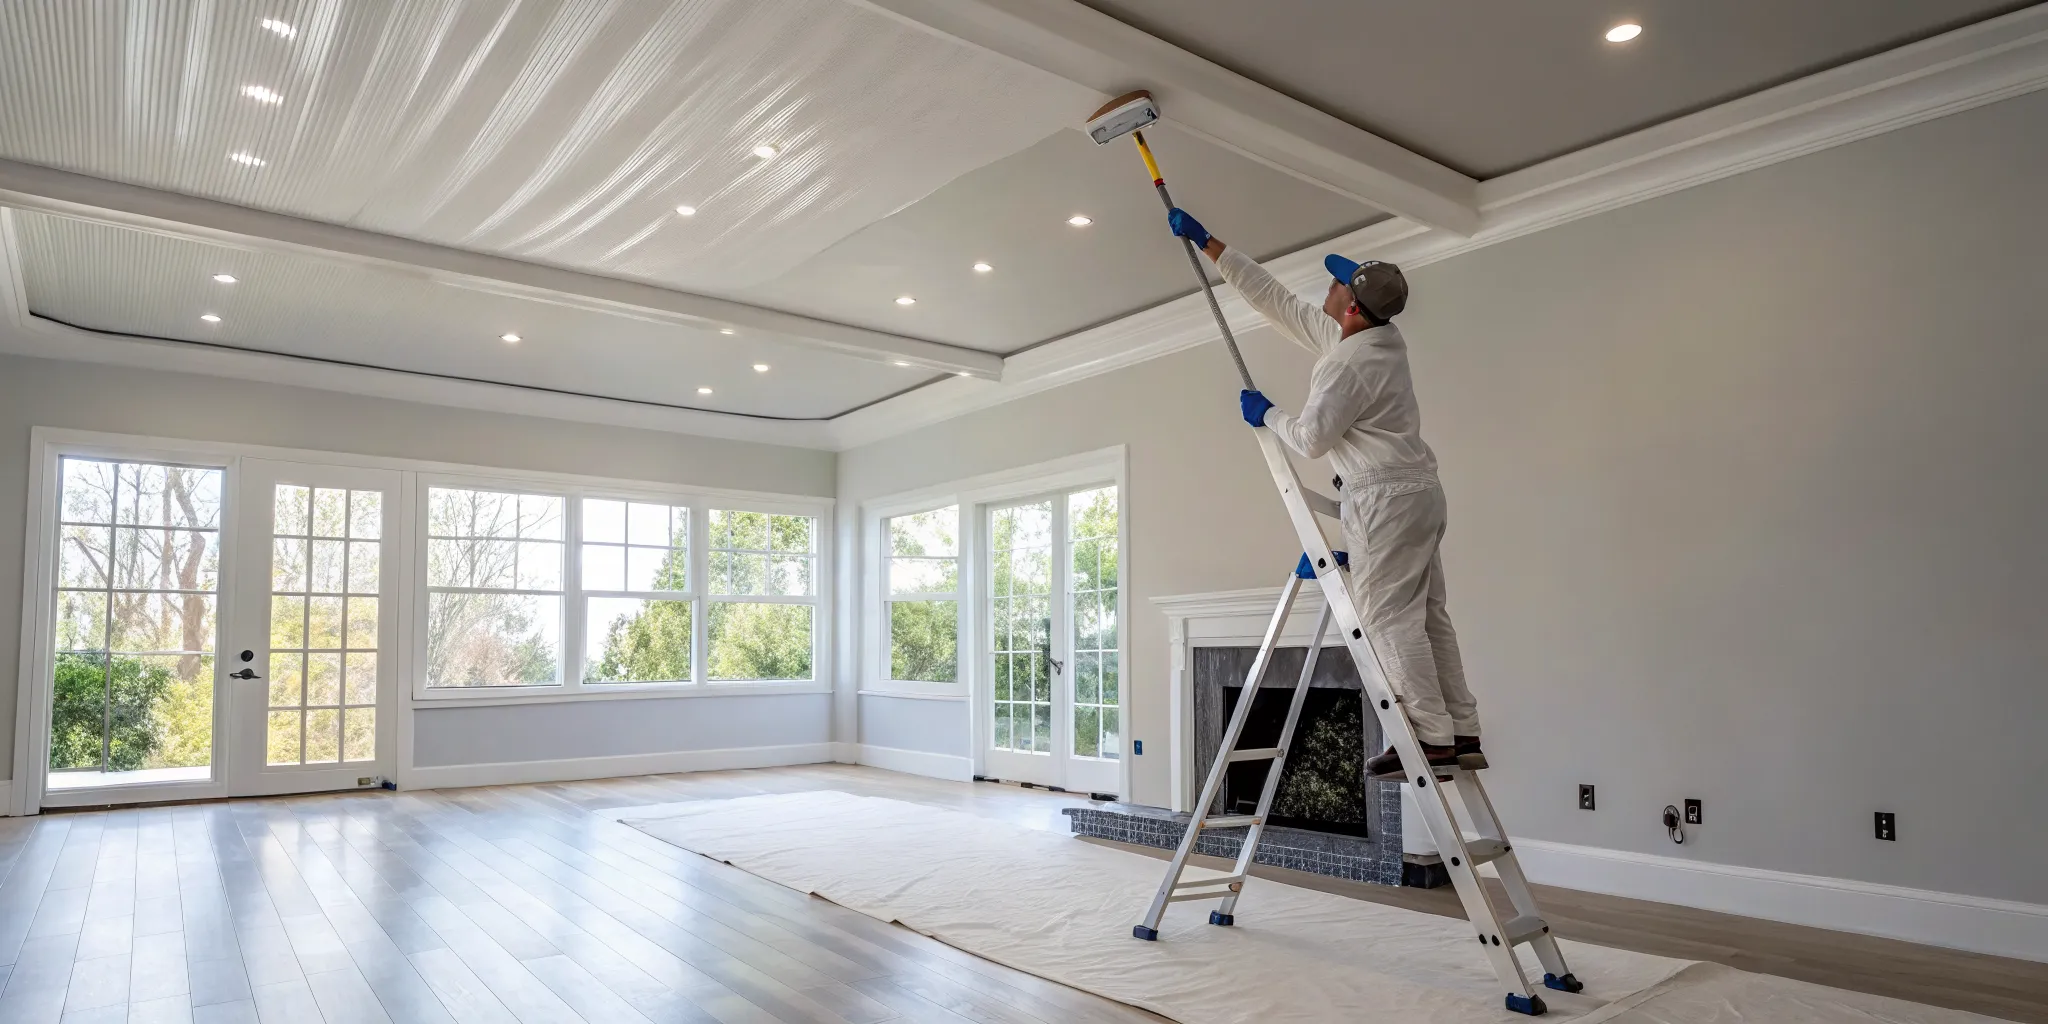
Step 1: Cut In Around the Edges
Before you pick up the roller, you need to tackle the perimeter of the ceiling. This process is called “cutting in,” and it creates a clean, crisp border that makes the rest of the job much easier. Grab an angled brush and apply a two- to three-inch band of paint where the ceiling meets the walls. Using painter’s tape along the top of the wall will give you an extra layer of protection against drips. Taking your time here is essential for achieving the sharp lines that define a quality expert interior painting job.
Pro Technique for Clean Lines
The secret to perfectly straight lines isn’t just a steady hand—it’s all in the brush technique. Start by dipping only the first third of your brush into the paint, then gently tap off the excess instead of scraping it on the can’s rim. As you bring the brush to the ceiling corner, apply light pressure. This allows the bristles to fan out just enough to create a razor-sharp edge that you can guide smoothly along the wall. Work in manageable three-foot sections to ensure the paint stays wet, which helps it blend seamlessly with the rolled sections later. This is the exact method our pros use to create those flawless lines that give a room a truly polished look. It might take a little practice, but the results are so worth it.
Step 2: Roll the Main Surface
Once you’ve cut in around the edges, you can start painting the main area of the ceiling. Attach an extension pole to your paint roller; this will save your back and allow you to maintain better control without constantly moving a ladder. Start in one corner of the room and roll the paint on in straight, slightly overlapping lines. Work your way across the ceiling in one continuous direction. This systematic approach ensures you get even coverage and don’t miss any spots along the way.
Step 3: Work in Sections to Maintain a Wet Edge
To avoid those dreaded lap marks and streaks, you need to maintain a “wet edge.” This just means you should always be painting from a wet section into a dry one, blending the new stroke into the previous one before it starts to dry. Work in small, manageable sections, and always complete a full line from one wall to the other without stopping in the middle. This technique is a signature of professional house painters because it guarantees a smooth, uniform finish across the entire surface.
Work in Small 3×3 Foot Sections
To make the “wet edge” technique more manageable, think of your ceiling in terms of a grid. Focus on painting one small, roughly 3×3 foot square at a time. As you finish one square, immediately move to the next, overlapping your roller strokes slightly into the still-wet paint of the previous section. This continuous motion is what blends everything together seamlessly. The key is to never let a paint edge dry before you blend the next section into it. This methodical approach is a cornerstone of any expert interior painting project and is the best way to ensure your ceiling has a consistent, flawless finish without any tell-tale roller marks.
Step 4: Remove Tape and Clean Up
Once the final coat is on and you’ve admired your work, the last step is the cleanup. Let the paint dry completely according to the manufacturer’s instructions before you do anything else. When it’s fully dry, carefully pull off the painter’s tape. Pull it at a 45-degree angle away from the painted edge to get the sharpest line possible. After the tape is gone, it’s time to clean your tools. A thorough cleanup not only leaves your space looking pristine but also preserves your brushes and rollers for future projects. This commitment to a tidy finish is something we take seriously, and you can learn more about us and our professional standards.
How to Clean Your Tools
Don’t let your quality tools go to waste. To clean up after using latex paint, all you need is warm water and a little soap. For your brushes, work the soap into the bristles with your fingers and rinse until the water runs clear. For rollers, remove the cover from the frame and wash it the same way, squeezing out the excess water before standing it on its end to dry. Properly cleaning your equipment ensures it will be ready for your next project. It’s a simple step that reflects a commitment to quality, which is a core part of our service guarantee from start to finish.
Tips for Painting Different Ceiling Types
Not all ceilings are simple, flat surfaces. From smooth drywall to textured popcorn and soaring vaulted ceilings, each type presents its own set of challenges. The key to a great result is knowing how to adapt your tools and techniques to the surface you’re working with. A method that works wonders on a smooth ceiling might create a mess on a textured one. Understanding these differences before you start will save you time, frustration, and a lot of paint. Below, we’ll walk through the best ways to handle the most common ceiling types, so you can feel confident no matter what you’re looking up at.
How to Paint a Smooth Ceiling
Smooth ceilings have a clean, modern look, but they are unforgiving when it comes to imperfections. Every bump, drip, and roller mark can stand out. Your first step is to ensure the surface is perfectly prepped, with all holes filled and sanded. For the paint itself, a flat or matte finish is your best friend. It does an excellent job of absorbing light and hiding minor flaws. Before you start rolling, use a quality paintbrush to “cut in” the edges where the ceiling meets the walls. This creates a clean line and allows you to roll close to the wall without hitting it. For a truly seamless look, always roll into your wet edge to avoid lap marks.
Painting Textured and Popcorn Ceilings
Textured ceilings, especially the popcorn style, require a gentle touch and the right tools. Because the texture can be fragile, a paint sprayer is often the best choice for even coverage without dislodging any material. If you prefer to use a roller, choose one with a thick nap (at least a half-inch) designed specifically for textured surfaces. This helps the paint get into all the nooks and crannies. Be careful not to oversaturate the ceiling with paint, as the moisture can cause the texture to soften and peel away. These ceilings can be messy to paint, which is why many homeowners trust our professional house painters to get the job done cleanly and efficiently.
Painting Vaulted or High Ceilings
Vaulted and high ceilings can make a room feel spacious and grand, but they pose a logistical challenge. Safety and efficiency are your top priorities here. An extension pole for your roller is a must-have, as it will allow you to do most of the work from the ground. To cover the large surface area more quickly, consider using a wider roller, like an 18-inch model. The key to avoiding streaks on such a large canvas is to work in manageable sections and always maintain a wet edge. Given the heights and angles involved, these projects can be difficult and risky to do on your own. For a perfect finish without the stress, you can always rely on our team of professionals to handle it for you.
Common Ceiling Painting Mistakes to Avoid
Painting a ceiling can feel like a major accomplishment, but a few common slip-ups can turn a weekend project into a frustrating ordeal. The good news is that these mistakes are easy to sidestep once you know what to look for. By paying a little extra attention to your preparation, materials, and technique, you can get a beautiful, professional-looking result that you’ll be proud of. Let’s walk through the most frequent missteps and how you can steer clear of them for a smooth, even finish.
Mistake 1: Rushing the Prep Work
I get it, prep work is the least exciting part of any painting project. It’s tempting to skip ahead to the main event, but this is where most DIY paint jobs go wrong. Proper preparation is the foundation for a flawless finish. Before you even think about opening a can of paint, take the time to cover everything you don’t want painted, including floors, furniture, and countertops. A little bit of plastic sheeting and painter’s tape goes a long way in preventing accidental splatters and drips. This step is non-negotiable for a clean, professional outcome and is a key part of any expert interior painting project.
Mistake 2: Using the Wrong Paint or Tools
The paint aisle can be overwhelming, but choosing the right products is crucial for a ceiling. Always opt for a flat or matte finish. Why? Because ceilings often have minor imperfections, and a non-reflective paint is fantastic at hiding them. Glossier sheens, on the other hand, will highlight every little bump and flaw. If you’re dealing with water spots or other stains, don’t just paint over them. You’ll need a high-quality stain-blocking primer first to prevent them from bleeding through your new paint. Using the right tools, like a quality roller with the correct nap length, also makes a huge difference in application and final texture.
Mistake 3: Applying Paint Incorrectly
Your painting technique can make or break the final look. One of the biggest mistakes is not maintaining a “wet edge.” This just means you should always be rolling from a wet area into a dry one, overlapping your strokes slightly. If you let an edge dry before you roll the next section, you’ll end up with visible lap marks and an uneven finish. A great way to avoid this is to work in small, manageable sections across the ceiling. Apply the paint, then lightly roll back over the area to smooth everything out before moving on. It’s this kind of careful technique that ensures a perfect result every time.
Pro Tips for a Flawless Finish
Getting that perfectly smooth, professional-looking ceiling is all about technique. Once you have the basics down, a few extra tricks can make all the difference between a good paint job and a great one. These are the tips we use to ensure every project meets our high standards. From managing the paint on your roller to using light to your advantage, these small adjustments will help you achieve a finish you can be proud of. It’s about working smarter, not harder, to get those crisp, even results.
Master Your Roller Pressure and Paint Load
The secret to avoiding roller marks is a two-step process: “laying it on” and “laying it off.” First, load your roller generously with paint and apply a thick, even layer to a section of the ceiling. Don’t be shy with the paint here. Then, without adding more paint, gently roll back over that same section with a light, smooth stroke to even everything out. This “laying off” technique smooths the paint and erases lap marks. Always roll from your new section back into the wet edge of the area you just painted. This helps all your strokes blend together seamlessly for a uniform look, a key part of any expert interior painting project.
Roll Slowly to Avoid Paint Splatter
When you’re painting a ceiling, one of the biggest annoyances is the fine mist of paint splatter that ends up on everything. The solution is surprisingly simple: just slow down. It’s easy to get into a rhythm and start rolling quickly, but that speed is what causes the roller to fling tiny droplets of paint everywhere. By maintaining a slow, deliberate pace, you ensure the paint transfers smoothly from the roller to the ceiling, not onto your floor. This is a key part of applying paint correctly and avoiding a huge mess. To get that seamless finish, also remember to keep a “wet edge” by always rolling from a wet section into a dry one. This technique blends your strokes together and prevents any noticeable lap marks.
Use Good Lighting to Spot Missed Spots
Lighting is your best tool for quality control. Whenever possible, roll in the same direction as the main source of natural light in the room, like a large window. This simple trick helps hide minor roller lines because the light skims across them rather than highlighting them. As you work, use a portable work light aimed at a low angle across the ceiling. This will cast shadows and reveal any drips, uneven spots, or missed areas that are invisible under direct overhead light. Catching these little imperfections while the paint is still wet allows you to fix them on the spot, saving you from frustrating touch-ups later.
Save Time If You’re Painting the Walls Next
If you’re planning a full room makeover, here’s a pro tip that will save you a ton of time and effort: always paint the ceiling first. This simple rule completely changes your workflow for the better. When you paint the ceiling before the walls, you can skip a tedious taping step. Instead of carefully taping where the wall meets the ceiling, just let your ceiling paint extend a couple of inches down the wall as you cut in. Later, when you’re ready to paint the walls, you’ll simply apply painter’s tape along the ceiling’s new, crisp edge. This method streamlines your entire project, allowing you to prep and paint more efficiently for a clean, cohesive look. It’s a small change in order that makes a huge difference and is a key part of any expert interior painting project.
How to Do a Final Inspection and Touch-Up
Patience is key after the first coat. Let the paint dry completely before you do a thorough inspection. A second coat is almost always a good idea, especially if you’ve patched any repairs or are covering a darker color. When you apply the second coat, roll it in a direction perpendicular to your first coat (if you rolled north-to-south first, roll east-to-west now). This cross-hatching technique helps ensure full coverage and further hides any potential roller marks. Once it’s dry, do one final check and touch up any small spots you may have missed. It’s this attention to detail that creates a truly flawless finish, which is something we back with our service guarantee.
A Little Ceiling Inspiration
Now that we’ve covered the technical side of painting a ceiling, let’s get to the fun part: inspiration. Your ceiling doesn’t have to be a plain white surface. Think of it as a blank canvas with endless creative potential. From the grandest historical masterpieces to playful DIY projects, looking at what’s possible can help you decide if you want to stick with a classic, clean look or try something more adventurous. A little inspiration can go a long way in helping you envision the perfect ceiling for your space, turning it from an afterthought into a true focal point of the room.
The Most Famous Ceiling Painting in History
When you think of a painted ceiling, it’s hard not to picture Michelangelo’s breathtaking work on the Sistine Chapel ceiling. Painted between 1508 and 1512, this masterpiece of High Renaissance art transformed the space into one of the most revered works in history. The ceiling famously depicts nine scenes from the Book of Genesis, including the iconic *Creation of Adam*. While you probably aren’t planning to hire a team of artists for a four-year project, this example shows the incredible impact a ceiling can have when treated as a work of art. It’s a powerful reminder that your “fifth wall” holds just as much design potential as the other four, and a commitment to quality can create something truly special in your own home. That same dedication to artistry is what drives any expert interior painting project.
Creative Idea: How to Paint Clouds on a Ceiling
If a Renaissance fresco feels a bit ambitious, here’s a more playful idea: paint a sky full of clouds. This is a fantastic way to add a touch of whimsy to a child’s bedroom, nursery, or playroom. The process is surprisingly simple and fun. You start by painting the entire ceiling a soft sky blue. Once it’s dry, you can use a natural sea sponge and white paint to dab on fluffy cloud shapes. Varying the pressure and the amount of paint will create a sense of depth and realism. It’s a creative project that adds a ton of personality and can make a room feel open and dreamy. For homeowners who love a creative idea but want a flawless execution, professional house painters can help bring that vision to life.
When to Call a Professional Painter
While tackling a ceiling painting project yourself can be rewarding, some situations are better left to the pros. It’s not about admitting defeat; it’s about making a smart choice for your home, your safety, and your schedule. A professional painter brings the right tools, years of experience, and an efficient team to get the job done right the first time. If you find yourself hesitating or feeling overwhelmed by the scale of the project, it might be the perfect time to call for backup. Recognizing when a project is beyond a comfortable DIY level can save you from frustration and costly mistakes, ensuring you get the beautiful, lasting finish you want without the headache.
If the Ceiling Is Too High or Hard to Reach
Painting a standard eight-foot ceiling is one thing, but vaulted or two-story ceilings are a different challenge entirely. Balancing on a tall ladder or setting up scaffolding is not only tricky but also risky without the proper training and safety equipment. Professionals are equipped to handle these heights safely and efficiently. Textured ceilings, like those with a popcorn finish, also present a unique problem. To avoid a clumpy, uneven mess, these surfaces often need to be sprayed, a technique that requires specialized tools and skill. If you’re dealing with soaring heights or tricky textures, bringing in a team for expert interior painting is your safest and most effective option.
If You’re Short on Time or Experience
Let’s be honest: painting a ceiling is a time-consuming job. Between clearing the room, prepping the surface, cutting in, and applying multiple coats, it can easily take up an entire weekend or more. If your schedule is already packed, a DIY project can drag on, leaving your home in disarray. Experience also plays a huge role in the final quality. A professional team knows how to achieve a streak-free finish and can complete the work in a fraction of the time. Trusting your home to a reputable company means you can relax, knowing the job is backed by a service guarantee and will be completed to the highest standard.
Trust the Experts at Boise Commercial & Residential Painting
If your ceiling project feels like more than you want to handle, that’s where we come in. At Boise Commercial & Residential Painting, we understand that proper preparation is what creates a truly professional finish. Our team never rushes this crucial stage, ensuring every surface is perfectly prepped for a flawless result. We bring years of experience and the right tools for any challenge, from soaring vaulted ceilings to tricky popcorn textures. You can learn more about our team and our commitment to quality. We handle the entire process efficiently and safely, so you can get back to enjoying your home. Plus, every project is backed by our service guarantee, giving you complete peace of mind.
Related Articles
- Creative Wall Painting Ideas for Every Room
- Wall Painting for Living Room: A Complete Guide
- Hiring Professional Painters? Read This First
- How to Hire Interior House Painters: A Guide
Frequently Asked Questions
Why is flat paint always recommended for ceilings? Flat paint is the go-to for ceilings because it doesn’t reflect light. This is a huge advantage because most ceilings have small imperfections, and a non-reflective finish does an amazing job of hiding them. A paint with any amount of gloss would catch the light and make every tiny bump or roller mark stand out, but a flat finish gives you a smooth, uniform look.
Do I really need to prime my ceiling before painting? Not always, but it’s a critical step in certain situations. If your ceiling has any stains from water, smoke, or grease, a stain-blocking primer is essential to prevent them from bleeding through the new paint. You should also prime any new drywall patches you’ve made, as the patched areas will absorb paint differently than the rest of the ceiling. Priming ensures your final coat looks even and professional.
What’s the best way to avoid leaving roller marks and streaks? The key is to maintain a “wet edge,” which just means you should always blend your current roller stroke into the one you just painted before it has a chance to dry. Work in small, manageable sections across the ceiling, and make sure your roller is loaded with enough paint. After applying paint to a new section, you can lightly roll back over it to smooth everything out for a seamless finish.
My ceiling is textured. Does that change how I should paint it? Yes, textured ceilings require a slightly different approach. You’ll need a roller with a thicker nap, usually a half-inch or more, to make sure the paint gets into all the little crevices of the texture. You also need to be gentle with your pressure, as too much force can break off pieces of the texture. For popcorn ceilings especially, a paint sprayer often gives the best results without damaging the surface.
How do I know if I should paint my ceiling myself or hire a professional? This really comes down to the scope of the project and your comfort level. If you have standard-height, smooth ceilings and the time for proper prep work, it can be a great DIY project. However, if you’re dealing with very high or vaulted ceilings, extensive repairs, or tricky textures like popcorn, calling a professional is often the safer and more efficient choice for a guaranteed quality result.