Brick painting Boise homeowners consider is more than a color choice because hot summers and cold winters affect how masonry finishes age. Paint creates a crisp, opaque look, while limewash keeps more brick texture visible and develops character over time.
Request a brick painting or limewash consultation with Paint Boise.
Brick painting Boise homeowners consider makes sense when sound masonry needs a uniform, modern color and the owners accept a lasting finish with regular upkeep. Limewash better suits porous, unpainted brick when the goal is a softer, mottled appearance that stays breathable through Treasure Valley temperature swings. Paint hides strong color variation and offers wide color control, but painted brick usually needs cleaning and repainting about every ten years. Limewash chemically bonds with porous masonry, preserves more natural character, and weathers over 5 to 15 or more years. Before choosing either finish, inspect the brick, mortar, existing coatings, and moisture issues because proper preparation determines whether the result holds up.
The practical question is not simply which finish looks better, but which one fits your masonry and maintenance plans. A successful brick painting Boise project starts with the surface condition, the look you want, and the upkeep you can accept. Here’s how.
How to plan a brick painting Boise project
Brick painting in Boise starts with two practical questions: what shape is the masonry in, and how should the finished wall age? Boise’s hot summers and cold winters can shorten the life of exterior coatings. A sound surface and the right finish help the project hold up through those shifts.
Check the masonry before choosing a finish
Look closely at the brick and mortar before discussing color. Cracked mortar, loose brick, peeling coatings, and signs of trapped moisture may call for repair first. Painting over those issues can hide them for a time, but it does not fix the cause.
Also check whether the brick has been painted before and when the home was built. Work on a pre-1978 home may disturb lead-based paint and create unsafe dust. The EPA recommends using a lead-safe certified contractor for projects where lead paint may be present.
Match the finish to the look and upkeep
Paint creates a solid layer of color, while brick stain soaks into masonry and keeps more natural texture visible. Limewash is another option. It is breathable, develops a worn look over time, and can help limit moisture buildup during Boise’s seasonal swings.
Each finish changes how the brick looks and ages. Paint gives the most even color, but painted brick needs regular cleaning and later repainting. Homeowners weighing texture, coverage, and long-term care can review this brick painting Boise guide before settling on a finish.
Plan the project around local conditions
Start with a full walkaround of the home. Note sprinkler spray, shaded areas, roof runoff, old repairs, and walls that receive strong afternoon sun. These details help define the prep work and show where a coating may face more wear.
Product choice should follow the brick condition and chosen finish, not just the preferred color. A guide to the best masonry paint can help explain which coatings suit porous surfaces. Ask how the crew will clean, repair, prime, apply, and protect nearby surfaces.
Timing matters as well. The work area needs suitable conditions during prep, application, and drying. Build room into the schedule for masonry repairs and weather delays. This is useful when several sides of the home have different sun exposure.
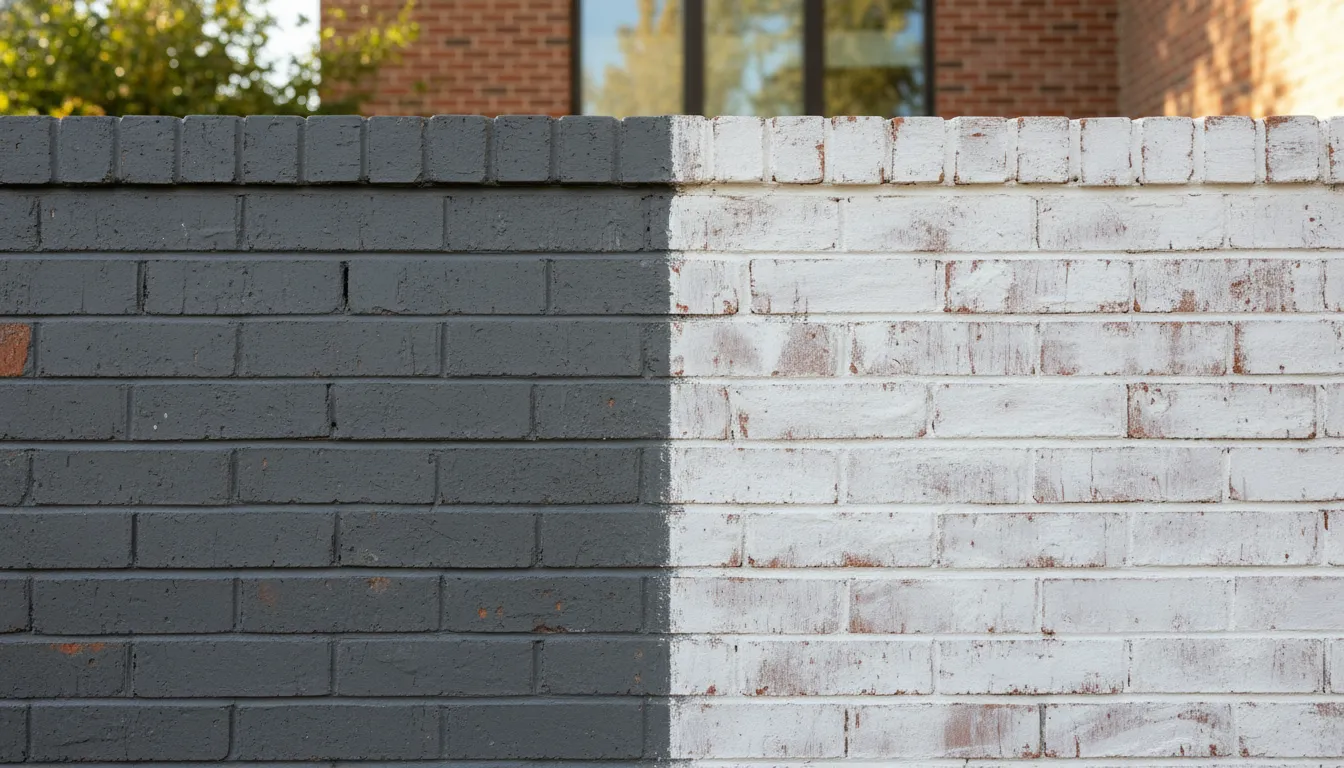
Painted brick vs. limewash: which finish fits your home?
Paint is best for homeowners who want an even, opaque color change, while limewash suits those who prefer visible brick texture and a naturally weathered finish. The right choice depends on the masonry’s condition, your preferred style, and how much ongoing upkeep you are comfortable planning.
Side-by-side finish comparison
This table shows the main differences to weigh before choosing a finish. For a wider look at available methods, see our brick painting Boise guide.
| Decision point | Painted brick | Limewashed brick |
|---|---|---|
| Appearance | Clean, even, and modern | Soft, aged, and varied |
| Opacity | Creates a solid color layer | Lets brick variation show through |
| Maintenance | Needs cleaning and later repainting | Wears and fades as part of its look |
| Reversibility expectations | Treat as a long-term surface change | Bonds with porous brick and is not easily removed |
| Best fit | Homeowners seeking a uniform update | Homeowners seeking vintage character |
How each finish ages
Paint adds an opaque coat, so dirt, chips, and wear can stand out against its even surface. Painted brick commonly needs more frequent cleaning and later repainting to keep that crisp look. Product choice and surface prep affect how the finish holds up. The brick’s condition matters too.
Limewash is breathable and weathers in a less uniform way. Its gradual wear is part of the finish rather than a flaw to hide. Boise’s hot summers and cold winters can affect exterior coatings. Moisture movement deserves careful thought. Our limewash painting overview explains how this finish works on porous masonry.
Matching the finish to your goals
Choose paint when you want full coverage, a sharp color shift, and a more modern facade. It can help make mixed or dated brick look consistent. That uniform result also means visible wear may call for touch-ups or a new coat over time.
Choose limewash when you want depth, texture, and an aged look that changes naturally. Do not treat it as a short trial. Limewash bonds with porous brick, and removal is not a simple reset. Test a small area first and view it in changing daylight.
Before coating older brick, check whether an existing painted surface may contain lead. The EPA recommends lead-safe work practices for painting or renovation projects involving lead-based paint in pre-1978 homes. This safety check matters whether the final plan uses paint or limewash.
When does painting brick make sense?
Painting brick makes sense when the masonry is sound and dry, and the homeowner wants a lasting, opaque color change. It can unify mixed brick tones and coordinate the facade with updated trim or siding. The condition beneath the coating matters more than the color choice.
Strong reasons to choose paint
Paint is a strong choice when natural brick color clashes with updated siding, trim, or landscaping. It can also make mismatched repairs less noticeable and give dated masonry a cleaner look. The homeowner should be comfortable covering the brick’s natural color and much of its visual variation.
- The brick and mortar feel firm, with no loose faces, deep cracks, or crumbling joints.
- The wall stays dry and has no known leaks, drainage problems, or damp interior spots.
- The goal is a solid color rather than a washed, varied, or natural brick finish.
- The homeowner accepts routine cleaning and future repainting as part of the plan.
Product choice and surface preparation must match the masonry. A guide to the best masonry paint can help explain why ordinary wall paint is not the default choice. A test area also shows how the selected color looks across mortar joints, shaded areas, and full sun.
Conditions that call for a pause
Paint should not be used to hide masonry trouble. Damp brick, active leaks, spalling faces, loose mortar, and failed repairs need attention before coating begins. Otherwise, the fresh finish may conceal the warning signs while the cause remains in place.
- Look for white deposits, dark damp areas, peeling old coatings, or recurring stains.
- Check whether sprinklers, gutters, roof runoff, or soil grade keep the wall wet.
- Have cracked mortar, soft brick, and poorly matched patchwork assessed before painting.
- Wait until repairs cure and the masonry is fully dry before the final coating plan.
Use extra care when older brick already carries paint. The EPA warns that work on a pre-1978 home with lead-based paint can create dangerous lead dust. Test first, and use lead-safe work methods if scraping, sanding, or repairs could disturb the coating.
When another finish fits better
Some sound brick should still remain unpainted. If the main goal is softer color while keeping visible texture and variation, stain or limewash may fit better. Stain enters the masonry, while paint adds an opaque color layer. Limewash offers a more weathered look and helps preserve the character of the surface.
The right decision balances appearance, brick condition, moisture, and future upkeep. Compare finish samples on the actual wall before making a long-term choice. Homeowners who want a breathable, aged look can also review limewash painting before committing to solid paint.
Ask Paint Boise to evaluate your brick and recommend a compatible finish.
How professionals prepare and finish exterior brick
A durable brick finish starts well before the first coat. Professionals inspect the wall, choose a compatible finish, and plan the work around surface conditions. This sequence helps paint bond evenly and lets limewash settle into the brick as intended.
Inspection and finish planning
The first visit should settle a basic question: is the wall sound enough to coat? A painter checks brick faces, mortar joints, old coatings, stains, and signs of trapped moisture. Loose mortar or damaged brick needs attention before finish work begins.
Crews also confirm whether the home may have older painted surfaces. Residential lead paint was banned in 1978. For earlier homes, the EPA advises hiring a lead-safe certified contractor trained in safe work methods. This check shapes containment, cleaning, and surface prep.
Finish choice changes the rest of the plan. Paint forms an opaque color layer, while limewash bonds with porous masonry and creates natural color shifts. Homeowners comparing finishes can review this brick painting Boise guide before approving a sample.
The professional application sequence
Each wall needs a clear path from inspection to final review. The exact tools and materials depend on the brick, mortar, existing finish, and chosen look. A typical professional process follows these steps:
- Inspect and test the surface. The crew checks for damage, moisture concerns, and old coatings. Small finish samples show how paint or limewash will look and bond.
- Protect the work area. Painters cover windows, doors, fixtures, plants, and nearby paving. They set safe access and contain debris before cleaning or scraping begins.
- Clean the masonry. The crew removes loose dirt, dust, residue, and growth with methods suited to the wall. Brick must be clean without harming its face or mortar.
- Complete needed repairs. Painters address loose material and coordinate repairs to failed mortar or damaged brick. A finish cannot hide an active wall problem.
- Prepare for the chosen finish. Painted brick may need a compatible masonry primer. Limewash prep focuses on clean, porous masonry and the moisture level required by the product.
- Apply and build the finish. Crews work across each section to manage coverage, edges, and texture. Paint aims for even coverage, while limewash may retain planned tonal shifts.
- Inspect and clean up. The team checks coverage, edges, drips, and missed joints from several angles. They complete touch-ups, remove protection, and leave care notes for the owner.
Details that shape the final look
Brick is not a flat surface. Deep mortar joints, rough faces, repairs, and mixed porosity can change how a coating appears. Professionals adjust brushes, rollers, or spray methods so the finish reaches joints without flooding the wall.
A sample area is useful because it shows the finish in real light and against nearby trim. It also sets expectations for texture and color variation. That matters most with limewash, where some variation is part of the intended look.
The final review should cover more than color. A professional checks whether the finish is even, details stay clean, and repaired areas blend with the wall. Owners should also receive clear guidance on cleaning, touch-ups, and signs that merit a follow-up visit.
How should you choose a brick color or limewash look?
Choose a brick color by comparing it with the roof, stone, trim, and hardscape in changing daylight. Solid paint creates a clean, even field of color, while limewash preserves more texture and natural variation. A large sample helps you judge how the finish will age beside fixed materials.
Colors that work with fixed materials
Use the roof, stone, trim, and hardscape as your starting palette. These surfaces cost more to change than paint, so the brick color should work with them. Compare each sample with the roof from the street. Then check it beside the trim and near patios or walkways.
Undertones matter because two similar neutrals can look quite different beside the same roof. A warm white may suit tan stone and cream trim. A cooler gray may fit charcoal roofing and crisp white trim. The best masonry paint also needs the right finish and product type for the surface.
- Pull warm or cool cues from the roof and stone.
- Choose a trim color with enough contrast to frame the brick.
- Check that patios and walkways do not clash with the sample.
- View the full home from the curb, not only up close.
Paint, limewash, and visible texture
Choose solid paint when you want the brick to read as one clear color. It can make mixed or dated brick tones feel more uniform. Choose limewash when you want softer shifts in tone and visible masonry character. Its worn look can suit traditional homes or add age to newer brick.
Decide how much variation feels right before work starts. Ask for samples that show a solid coat and a softer limewash look on the actual brick. The brick painting Boise guide explains how painting, limewashing, staining, and German smear differ. That context can help you avoid choosing by color alone.
A useful sample review
Test more than a small color chip. A larger sample shows how mortar lines, brick texture, and shadows affect the result. View it in morning light, full sun, shade, and evening light. Boise’s bright sun can make a pale color seem sharper, while shade can reveal undertones.
Keep each sample in place for a few days before making the final call. Compare it from the curb and from the areas used most often. If the home was built before 1978, do not sand old painted trim during sampling. The EPA warns that painting and renovation work can create dangerous lead dust in older homes.
Once the field is narrow, compare finish samples beside the exact trim color. Confirm whether you want crisp, full coverage or a broken, aged look. A clear sample plan makes the final choice easier and gives the painting team a precise visual target.
What maintenance does finished brick need?
Finished brick needs seasonal inspection, gentle cleaning, and prompt attention to moisture or damaged mortar. Painted and limewashed walls age differently, but both benefit when small problems are addressed before they spread. Check especially near gutters, windows, rooflines, and sprinkler-exposed areas.
A practical inspection routine
Check exterior brick each spring and fall, plus after strong storms. Look closely near gutters, downspouts, windows, doors, rooflines, and the base of each wall. These spots often show stains, failed joints, or coating wear first.
On painted brick, note peeling, bubbles, cracks, chalky areas, and places where the color has faded. On limewashed brick, gradual fading and an uneven patina can be part of the intended look. Still, loose mortar or damaged brick needs attention under either finish.
- Photograph each side of the building from the same place.
- Mark small defects on a sketch or saved photo.
- Check caulk, mortar joints, gutters, and nearby sprinklers.
- Keep leftover product labels and finish colors for future touchups.
Cleaning and touchups
Start cleaning with water, a soft brush, and a mild cleaner suited to masonry. Test a hidden patch before treating a broad area. Harsh pressure or strong chemicals may damage mortar, strip limewash, or leave painted brick with an uneven sheen.
Small paint touchups work best when the brick is clean, dry, and sound. Match the original product and sheen when possible. If failures appear across several areas, review the surface and coating choice before adding more paint. Our guide to the best masonry paint explains why the finish must suit porous masonry.
Limewash touchups can blend into its soft, varied look, but they may remain visible while curing. Keep notes on the original mix and application method. The broader brick painting Boise guide compares limewash with other brick finishes.
Moisture and safety warning signs
Do not cover a damp or failing area with a quick touchup. White mineral deposits, dark stains, musty odors, soft mortar, bubbles, or repeated peeling can point to unwanted moisture. Find and fix the water source before repairing the finish.
Possible sources include leaking gutters, failed flashing, cracked mortar, poor drainage, or sprinklers aimed at the wall. Plan broad repairs for a dry weather window. Ask a masonry or painting professional to assess damage that returns after repairs.
Use extra care when an older painted surface may contain lead. Sanding or scraping can spread dangerous dust. The EPA advises that painting work involving lead-based paint can create dangerous lead dust, especially in homes built before 1978. Review the EPA’s lead-safe renovation guidance before disturbing an older coating.
Should you DIY or hire a brick painting professional?
DIY can work for a small, sound wall at ground level, but a full brick exterior is usually safer and more reliable in professional hands. A professional can assess masonry condition, identify existing coatings, manage access, and complete the detailed preparation that determines how well the finish lasts.
When DIY may be a good fit
DIY makes the most sense when the brick is easy to reach, clean, dry, and free of damage. You should also know what coating is already present. Test a small area before committing, since brick, mortar, old coatings, and new products may not work well together.
Product choice matters because paint forms a colored layer, while stain soaks into brick and keeps more natural texture. Review the best masonry paint options before buying primer or coating. Follow the product label for surface prep, drying time, and weather limits.
- Choose DIY for a small wall or fireplace with safe, simple access.
- Pause if brick is soft, cracked, stained, or holding moisture.
- Avoid guessing about old paint, sealers, or an unknown prior coating.
When professional help reduces risk
Hire a professional when the project needs tall ladders, lifts, repairs, broad masking, or work near roofs and power lines. Safe access is only one factor. A painter should also find failed mortar, peeling coatings, and moisture concerns before prep begins.
Older painted homes need another safety check. The EPA warns that painting work in a pre-1978 home with lead-based paint can create dangerous lead dust. It recommends hiring a lead-safe certified contractor for this type of work.
Professional help is also useful when the finish choice is unclear. Paint, stain, and limewash create different looks and interact with masonry in different ways. A skilled contractor can explain the tradeoffs and create a sample before the whole surface changes.
What a useful quote should include
A useful brick painting Boise quote should explain the work, not just list one price. Ask each contractor to describe cleaning, repairs, masking, primer, coating, application method, and cleanup. The quote should also state which surfaces are included and how the crew will reach them.
Ask why the proposed coating suits your brick and any existing finish. Also request a clear schedule, payment terms, warranty details, and a plan for hidden damage. When comparing bids, use the same scope so a low price does not hide less prep.
Before signing, review past brick work and ask how the painter handles samples and change orders. Use these questions as you prepare to hire professional brick painters. They can help you compare contractors on equal terms.
Frequently Asked Questions
How much does it cost to have your brick painted?
Professional brick painting commonly costs between $3,500 and $10,500, with an average near $7,000, according to Paint Boise’s brick painting service guide. Final pricing depends on wall area, brick condition, repairs, access, preparation, and coating choice. A detailed site estimate is more reliable than a square-foot estimate because masonry conditions vary.
What is the downside to painting brick?
Painting brick is a long-term change because paint covers its natural color and texture. If moisture becomes trapped or preparation is poor, the coating may peel, blister, or hide masonry problems. Painted brick also needs cleaning and eventual repainting. Before painting, repair damaged mortar and confirm the wall is dry and suitable for a coating.
Is it a good idea to paint exterior brick?
Painting exterior brick can make sense when the masonry is sound and the goal is a uniform, opaque color. It is less suitable when the brick has unresolved moisture issues, crumbling mortar, or historic character worth preserving. In Boise’s hot summers and cold winters, careful preparation and a masonry-compatible coating help the finish handle seasonal exposure.
What kind of paint should be used on exterior brick?
Use a high-quality exterior masonry coating designed to bond with porous brick and mortar. The correct system may include cleaning, repairs, and a compatible masonry primer before the finish coats. Avoid treating brick like siding with a generic paint system. A painter should evaluate moisture, previous coatings, and brick condition before selecting the product.
Why is limewashing better than painting brick?
Limewash is not always better than paint, but it fits projects that need a breathable, varied finish rather than solid color. It bonds with porous masonry and develops a softly weathered appearance as it ages. According to Paint Boise’s limewash guide, limewash can weather naturally for 5 to 15 years or longer. Paint provides more uniform coverage and stronger color control.
Ready to Choose the Right Finish for Your Brick?
Waiting can leave worn or outdated brick pulling attention away from the rest of your home’s exterior. Starting now gives you time to compare paint and limewash, settle on the right look, and plan work around your schedule. A clear choice today also helps you avoid rushing into a finish that may not match your goals.
Paint Boise can help you weigh the look, upkeep, and long-term fit of each option before you commit to changing your Boise home’s brick. Bring your questions, preferred colors, and photos of the brick so the first conversation stays focused on your priorities. Ready to make a confident choice? Request a brick painting or limewash quote to start planning your exterior project.